Mary Berry Recipes
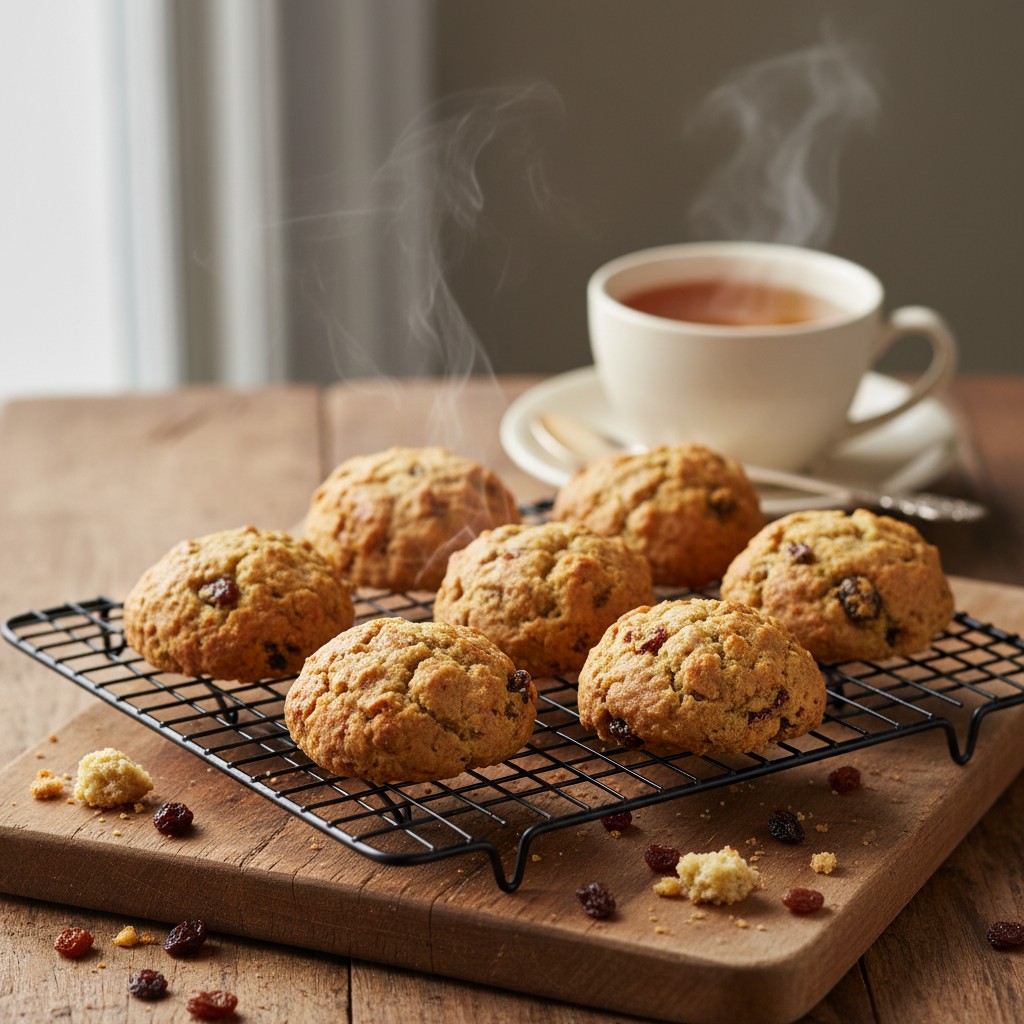
Classic British Rock Cakes
These delightful rock cakes are a true taste of British tradition, wonderfully simple to prepare and perfect for an afternoon tea. With a craggy exterior and a tender, fruit-studded interior, they're a sheer joy to bake and share.
Why You'll Love This Recipe
- They are wonderfully quick and easy to prepare, perfect for a spontaneous baking session.
- Using simple, readily available pantry ingredients means you can whip them up anytime.
- Their rustic, 'rocky' appearance means there's no pressure for perfection – charmingly imperfect is best!
- A versatile treat that's ideal for afternoon tea, lunchboxes, or a comforting snack.
Ingredients
- 225g (8oz) self-raising flour
- 50g (2oz) cold butter, cut into small cubes
- 50g (2oz) caster sugar
- 75g (3oz) mixed dried fruit (sultanas, currants, raisins)
- 1 large egg, beaten
- 2-3 tablespoons milk
- A pinch of salt
- A little extra caster sugar for sprinkling (optional)
Equipment Needed
Large mixing bowl • Sieve • Baking tray • Baking parchment (optional) • Measuring scales • Measuring spoons • Fork or butter knife • Two dessert spoons • Wire cooling rack
Step-by-Step Instructions
- Preheat your oven to 190°C (170°C fan/Gas Mark 5). Lightly grease a baking tray or line it with baking parchment.
- In a large mixing bowl, sift the self-raising flour and a pinch of salt. Add the cold butter cubes. Using your fingertips, gently rub the butter into the flour until the mixture resembles fine breadcrumbs. Try not to overwork it, my dear, as a light hand is key to a tender cake.
- Stir in the caster sugar and the mixed dried fruit, ensuring they are evenly distributed throughout the 'breadcrumb' mixture.
- Make a well in the centre of the dry ingredients. Add the beaten egg and about 2 tablespoons of milk. Use a fork or a knife to mix everything together, bringing the dough into a stiff, shaggy ball. If the mixture feels a little dry, add the third tablespoon of milk, a tiny bit at a time, until it just comes together. It should be quite stiff and not sticky.
- Using two dessert spoons, spoon rough, craggy heaps of the dough onto your prepared baking tray. Don't worry about making them neat; their rustic, uneven appearance is part of their charm! Leave a little space between each 'rock' as they will spread slightly.
- If you wish, sprinkle a little extra caster sugar over the tops of the rock cakes for a lovely, sparkling finish.
- Bake in the preheated oven for 12-15 minutes, or until they are golden brown and feel firm to the touch. Keep a close eye on them, as ovens can vary!
- Carefully transfer the baked rock cakes to a wire rack to cool completely. They are truly delightful warm, but equally delicious once cooled.
- Serve with a lovely cup of tea and enjoy a taste of pure British tradition!
How to Store \u0026 Reheat
Once completely cool, store your rock cakes in an airtight container at room temperature for up to 3-4 days. While they are truly at their best on the day they are baked, they will remain wonderfully edible for a few days. I don't typically recommend reheating, as they are meant to be enjoyed at room temperature, but a gentle warming in a low oven for a few minutes can revive them slightly if desired.
Mary's Secrets to Success
My 'Secrets to Success': 1. **Cold Butter is Best:** Ensure your butter is lovely and cold when you rub it into the flour. This creates little pockets of steam during baking, leading to a wonderfully light texture. 2. **A Light Hand:** When mixing your dough, be gentle. Overworking the dough develops the gluten too much, which can lead to tough rock cakes. Just bring it together until it forms a stiff ball. 3. **Don't Overbake:** Keep a watchful eye on your oven. Rock cakes bake quite quickly, and overbaking will make them dry. They should be beautifully golden brown and firm to the touch. 4. **Embrace the Rustic:** There's no need for perfection with rock cakes! Their craggy, uneven shapes are part of their charm. Simply spoon them onto the tray and let their natural form shine.
Frequently Asked Questions
Why are they called rock cakes?
They get their charming name from their wonderfully craggy, uneven, 'rock-like' appearance. Unlike a scone or a bun, they aren't meant to be perfectly formed, and that rustic quality is all part of their appeal!
How do I prevent my rock cakes from being too dry or crumbly?
The key is not to overbake them, my dear. Keep a close eye on them in the oven and remove them as soon as they are golden. Also, ensure your dough is just moist enough – it should be stiff but not dry or falling apart before baking. A light hand when mixing also helps to keep them tender.
Can I use different types of dried fruit?
Absolutely! Mixed dried fruit is traditional, but you can certainly use just sultanas, currants, or raisins. For a little twist, try adding some chopped glacé cherries or even a sprinkle of orange zest with the fruit for an extra burst of flavour.
Can I freeze rock cakes?
Yes, you can! Once fully baked and cooled, place them in an airtight container or freezer bag and freeze for up to 1 month. Thaw at room temperature. You can also freeze the unbaked 'rock' shapes on a tray, then transfer to a bag once frozen, baking them from frozen for a few extra minutes when needed.
What's the secret to achieving that lovely, tender texture?
The secret, my dear, lies in two main things: using cold butter and handling the dough as little as possible. Rubbing the butter in lightly until it resembles breadcrumbs, and then just bringing the dough together without overworking it, will ensure a light and tender crumb.