Mary Berry Recipes
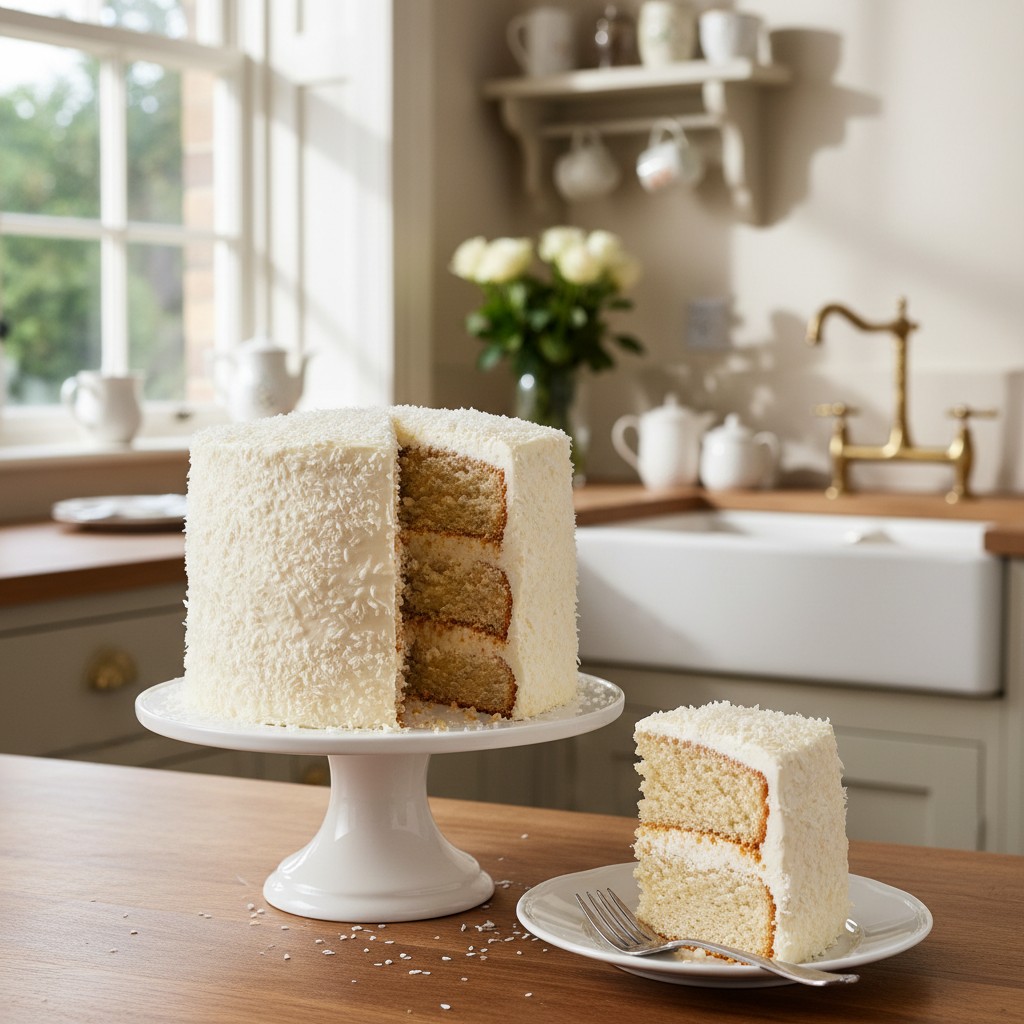
Classic Coconut Cake with a Zesty Finish
This delightful coconut cake is a true taste of sunshine, wonderfully moist and simply bursting with tropical flavour. It's a comforting bake that brings joy with every single slice, perfect for sharing.
Why You'll Love This Recipe
- Uses readily available ingredients for convenience.
- The combination of coconut in the sponge and frosting delivers maximum flavour.
- It's a versatile cake, perfect for everyday enjoyment or special occasions.
Ingredients
- 225g (8oz) self-raising flour
- 1 tsp baking powder
- 225g (8oz) caster sugar
- 225g (8oz) unsalted butter, softened
- 4 large free-range eggs
- 100g (3½oz) desiccated coconut
- 1 tsp vanilla extract
- 2 tbsp milk
- 150g (5½oz) unsalted butter, softened (for buttercream)
- 300g (10½oz) icing sugar, sifted (for buttercream)
- 2-3 tbsp coconut milk (from a can, thick part) (for buttercream)
- 1 tsp vanilla extract (for buttercream)
- Zest of 1 lime (optional, but highly recommended) (for buttercream)
- 50g (1¾oz) desiccated coconut, for decorating
Equipment Needed
Electric mixer (stand mixer or hand-held) • Large mixing bowl • Two 20cm (8-inch) round sandwich tins • Baking parchment • Wire cooling rack • Spatula or palette knife • Sieve (for icing sugar)
Step-by-Step Instructions
- Preheat your oven to 180°C (160°C fan/Gas Mark 4). Grease and line two 20cm (8-inch) round sandwich tins with baking parchment. This ensures your cakes turn out beautifully every time.
- In a large mixing bowl, combine the self-raising flour, baking powder, caster sugar, softened butter, eggs, 100g desiccated coconut, vanilla extract, and milk.
- Using an electric mixer, beat all the ingredients together for about 2-3 minutes until the mixture is light, fluffy, and well combined. Be sure to scrape down the sides of the bowl to ensure everything is incorporated evenly.
- Divide the cake mixture evenly between the two prepared tins. Smooth the tops with the back of a spoon or a small spatula.
- Bake for 30-35 minutes, or until the cakes are golden brown, spring back when lightly touched in the centre, and a skewer inserted into the middle comes out clean.
- Allow the cakes to cool in their tins for 10 minutes before turning them out onto a wire rack to cool completely. Patience is key here; attempting to frost warm cakes will only lead to a messy disaster!
- While the cakes are cooling, prepare the coconut buttercream. In a clean bowl, beat the softened butter until very pale and creamy.
- Gradually add the sifted icing sugar, a little at a time, beating well after each addition until the mixture is light and fluffy.
- Stir in the coconut milk, vanilla extract, and lime zest (if using). Continue to beat until you have a smooth, spreadable buttercream. If it's too thick, add a tiny bit more coconut milk; if too thin, add a little more sifted icing sugar.
- Once the cakes are completely cool, place one sponge on your serving plate or cake stand. Spread about a third of the buttercream evenly over the top.
- Carefully place the second sponge on top. Use the remaining buttercream to generously cover the top and sides of the cake, creating a lovely, smooth finish.
- To decorate, gently press the remaining 50g of desiccated coconut onto the top and sides of the cake. This adds wonderful texture and a beautiful finish.
- Slice and serve with a lovely cup of tea. Enjoy this sheer perfection!
How to Store \u0026 Reheat
This cake keeps beautifully! Store it in an airtight container at room temperature for up to 3-4 days. In very warm weather, you might consider storing it in the refrigerator, but allow it to come back to room temperature for about 30 minutes before serving to ensure the sponge is at its best and the buttercream is soft and yielding. It does not typically require reheating, as it's best served at room temperature. For longer storage, the unfrosted sponges can be wrapped well and frozen for up to 1 month. Thaw thoroughly before frosting.
Mary's Secrets to Success
For sheer perfection, always ensure your butter and eggs are at room temperature before you begin. This allows them to emulsify beautifully, creating a much lighter and airier sponge. And when decorating, don't be afraid to be generous with your coconut – it adds such a wonderful finish and that irresistible texture! A lovely, sharp palette knife makes spreading the buttercream a joy. Happy baking, my dears!
Frequently Asked Questions
Can I use fresh coconut instead of desiccated?
While fresh coconut is lovely, it has a higher moisture content which can alter the cake's texture. For this recipe, I highly recommend sticking to desiccated coconut for the best results and consistency.
My buttercream is splitting, what should I do?
This sometimes happens if the butter is too cold or too warm. Try placing the bowl over a pan of very gently simmering water for just a few seconds, whisking constantly, until it just starts to come back together. Alternatively, if it's too warm, pop it in the fridge for 10-15 minutes and then beat again.
Can I make this cake into cupcakes?
Absolutely! This recipe works wonderfully for cupcakes. Simply divide the mixture into 18-24 cupcake cases and bake for 20-25 minutes, or until golden and springy. Adjust the frosting quantity as needed.
How do I ensure my cake is moist?
The key to a moist cake is not to overmix the batter once the flour is added, and crucially, not to overbake it. Keep a close eye on your oven and test for doneness with a skewer. The addition of milk and the natural fats in the coconut also help keep this cake beautifully moist.
Can I make this gluten-free?
You certainly can! Replace the self-raising flour with a good quality gluten-free self-raising flour blend (ensure it contains xanthan gum, or add ½ tsp if not). The baking powder and other ingredients remain the same.