Mary Berry Recipes
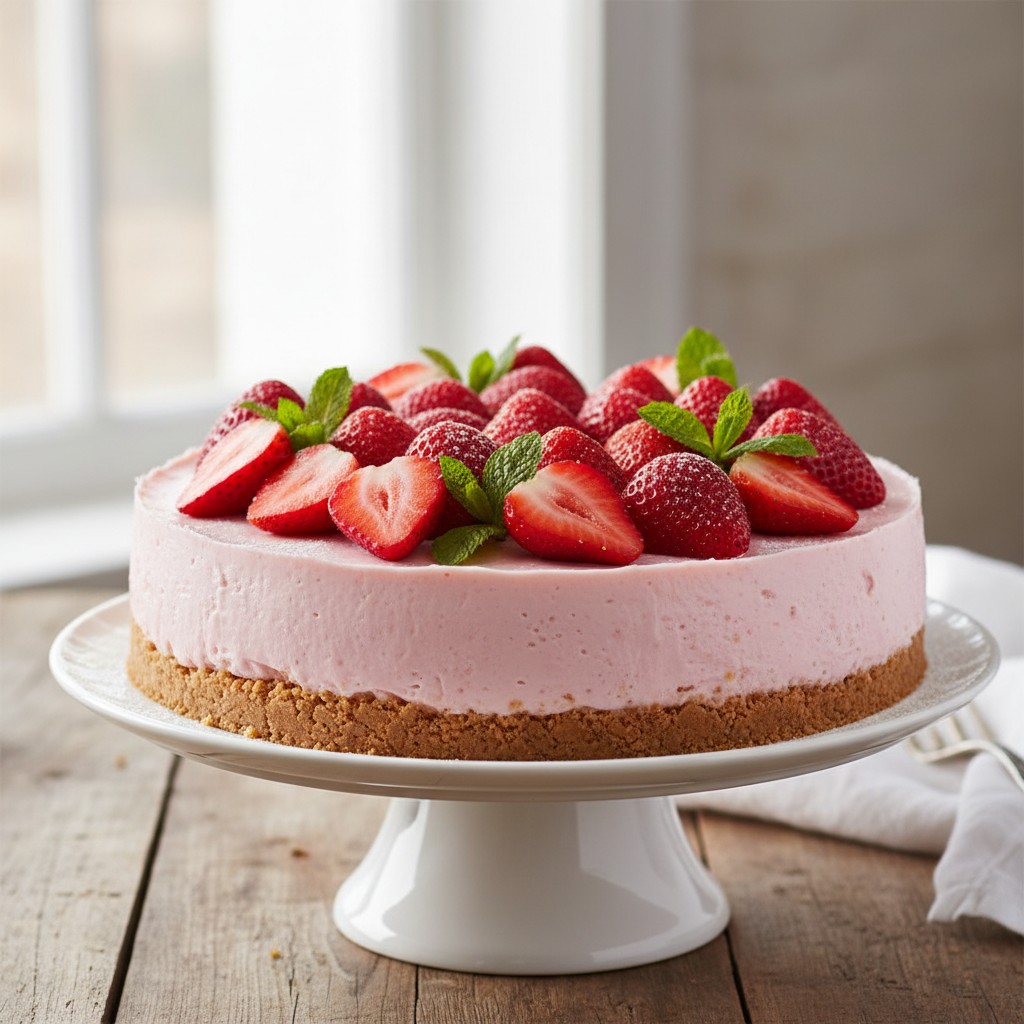
Classic British Strawberry Cheesecake
A true showstopper, this classic strawberry cheesecake is wonderfully simple to prepare and an absolute delight for the taste buds. Its creamy texture and vibrant fruit topping make it a real family favourite.
Why You'll Love This Recipe
- It's a no-bake wonder, making it incredibly straightforward and perfect for warmer days, or when you simply want a fuss-free dessert.
- The combination of the crunchy biscuit base, the light and tangy cream cheese filling, and the fresh, sweet strawberries offers a delightful contrast of textures and flavours.
- This recipe is wonderfully adaptable; while strawberries are classic, you can easily swap them for other seasonal fruits, making it a versatile dessert for any time of year.
Ingredients
- 250g digestive biscuits
- 100g unsalted butter, melted
- 600g full-fat cream cheese, at room temperature
- 150g icing sugar, sifted
- 1 tsp vanilla extract
- Finely grated zest of 1 lemon
- 300ml double cream
- 500g fresh strawberries, hulled and halved or quartered
- 2 tbsp strawberry jam (optional, for glaze)
Equipment Needed
23cm (9-inch) springform tin • Large mixing bowl • Electric hand mixer or stand mixer • Rubber spatula or metal spoon • Small saucepan (for melting butter) or microwave-safe bowl • Rolling pin (if not using a food processor) • Freezer bag (if not using a food processor) • Measuring cups and spoons • Sieve (optional, for jam glaze)
Step-by-Step Instructions
- Firstly, my dears, let's prepare the base. Place your digestive biscuits into a strong freezer bag and bash them with a rolling pin until they are finely crushed. Alternatively, a food processor does this job beautifully.
- Melt the butter gently in a small saucepan or in the microwave. Pour the melted butter over the crushed biscuits and mix thoroughly until all the crumbs are coated. This ensures a good, sturdy base, you see.
- Tip the buttery biscuit mixture into a 23cm (9-inch) springform tin. Press it down firmly and evenly over the base using the back of a spoon or your knuckles. Pop this into the fridge to chill while you prepare the filling.
- Now for the glorious filling! In a large mixing bowl, beat the room temperature cream cheese until it's lovely and smooth. This is key for a lump-free filling, my dear.
- Gradually beat in the sifted icing sugar, vanilla extract, and lemon zest until everything is well combined and beautifully creamy.
- In a separate bowl, whisk the double cream until it forms soft peaks. Be careful not to over-whisk it, as we want it light and airy, not stiff.
- Gently fold the whipped cream into the cream cheese mixture using a large metal spoon or spatula. Do this with a light hand to keep all that wonderful air in the mixture.
- Spoon the creamy filling over the chilled biscuit base, spreading it evenly to the edges. Smooth the top with the back of a spoon or an offset spatula for a neat finish.
- Cover the cheesecake loosely with cling film and refrigerate for at least 4 hours, though overnight is truly best for it to set properly and achieve sheer perfection.
- Just before serving, arrange the fresh strawberries artfully over the top of the cheesecake. If you wish for a lovely shine, gently warm the strawberry jam with a tablespoon of water, then pass it through a sieve and brush it over the strawberries.
- Carefully release the cheesecake from the springform tin and transfer it to a serving plate. Slice with a sharp knife, dipped in hot water and wiped clean between each cut, for wonderfully neat portions. Enjoy, my dears!
How to Store \u0026 Reheat
This cheesecake keeps wonderfully in the refrigerator for up to 3-4 days. Do ensure it's covered loosely to prevent it from drying out or absorbing other food odours. It is not suitable for freezing once assembled, as the texture of the cream cheese filling can become a little grainy upon thawing, and the fresh strawberries will lose their lovely firmness. As it's a chilled dessert, reheating is certainly not required, my dear!
Mary's Secrets to Success
My top tip for a truly exquisite cheesecake is to ensure your cream cheese is at room temperature before you begin. This makes it wonderfully smooth and easy to beat, preventing any pesky lumps in your filling. And when folding in the whipped cream, be ever so gentle; we want to retain all that lovely air for a light-as-a-feather texture. Finally, patience, my dears, is a virtue – allow that cheesecake to chill thoroughly for sheer perfection!
Frequently Asked Questions
Why didn't my cheesecake set properly?
Ah, the setting of a no-bake cheesecake is all about patience and the right ingredients! Ensure you use full-fat cream cheese and double cream, as these have the necessary fat content to firm up. Also, it's crucial to give it enough chilling time – at least 4 hours, but truly, overnight is best for that perfect, firm slice. Don't rush it, my dear!
Can I make this cheesecake ahead of time?
Absolutely, and I highly recommend it! This cheesecake is truly at its best when made the day before you plan to serve it. This allows ample time for the filling to set beautifully and for the flavours to meld together perfectly. Just add the fresh strawberries on the day of serving to keep them at their freshest.
How do I prevent a soggy biscuit base?
The secret to a good, sturdy base that isn't soggy lies in two things: ensuring the biscuit crumbs are thoroughly coated with melted butter, and pressing them down very firmly into the tin. This creates a compact layer that acts as a barrier. Also, chilling the base before adding the filling helps it to firm up properly.
Can I use frozen strawberries?
While fresh strawberries are ideal for their vibrant colour and firm texture, you can use frozen ones if fresh are unavailable. However, allow them to thaw completely and drain away any excess liquid thoroughly before arranging them on top, otherwise, they can release too much water and make the topping watery, which we certainly don't want!
What if I don't have a springform tin?
Not to worry, my dear! You can line a regular 20-23cm (8-9 inch) round cake tin with baking parchment, leaving an overhang to help you lift the cheesecake out once set. Or, for individual portions, small ramekins or dessert glasses can be used, simply spooning the base and filling into them.