Mary Berry Recipes
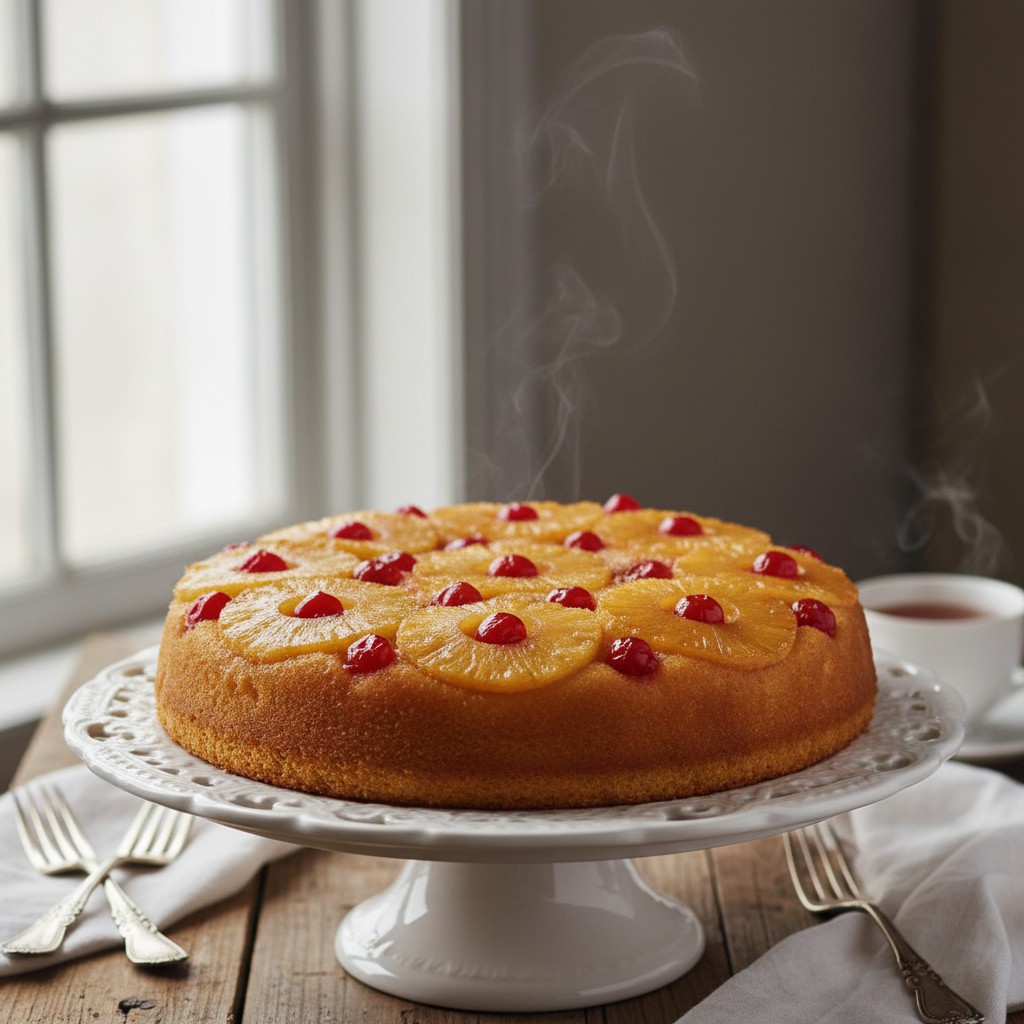
Classic Pineapple Upside Down Cake
This delightful Pineapple Upside Down Cake is a true testament to simple pleasures, offering a beautifully moist sponge crowned with glistening, caramelised pineapple. It’s a wonderfully easy recipe that promises sheer perfection every time, making it a real family favourite.
Why You'll Love This Recipe
- Visually stunning with its vibrant fruit topping, making it a showstopper with minimal effort.
- The caramelised pineapple infuses the sponge with moisture and a delightful sweet-tart flavour.
- Uses everyday pantry staples, making it accessible and economical for any home baker.
Ingredients
- 50g unsalted butter, melted (for the topping)
- 100g light muscovado sugar (for the topping)
- 1 x 425g tin pineapple rings in syrup, drained (reserve 2 tbsp syrup) (for the topping)
- 8 glacé cherries, halved (for the topping)
- 175g self-raising flour (for the cake)
- 175g caster sugar (for the cake)
- 175g unsalted butter, softened (for the cake)
- 3 large eggs (for the cake)
- 1 tsp vanilla extract (for the cake)
- 2 tbsp reserved pineapple syrup (for the cake)
Equipment Needed
23cm round springform or loose-bottomed cake tin • Baking parchment • Large mixing bowl • Electric hand mixer or stand mixer • Rubber spatula • Wire cooling rack • Serving plate
Step-by-Step Instructions
- Preheat your oven to 180°C (160°C fan/Gas Mark 4). Lightly grease and line the base of a 23cm round springform or loose-bottomed cake tin with baking parchment.
- Prepare the topping: Pour the melted butter evenly over the base of the prepared tin. Sprinkle the muscovado sugar over the butter.
- Arrange the drained pineapple rings neatly on top of the sugar and butter layer. Place a halved glacé cherry in the centre of each pineapple ring, and scatter any remaining cherry halves in the gaps.
- Make the cake batter: In a large mixing bowl, measure the self-raising flour, caster sugar, softened butter, and eggs. Add the vanilla extract and the 2 tablespoons of reserved pineapple syrup.
- Using an electric hand mixer or a stand mixer, beat all the cake ingredients together until the mixture is light, fluffy, and well combined. Be careful not to overmix; just until everything is incorporated.
- Gently spoon the cake batter evenly over the pineapple and cherry topping in the tin. Carefully spread it right to the edges, ensuring the fruit is completely covered.
- Bake in the preheated oven for 35-40 minutes, or until the cake is golden brown, well risen, and a skewer inserted into the centre comes out clean.
- Once baked, remove the cake from the oven and let it stand in the tin for 5 minutes. This little pause helps the caramel to set slightly and prevents the fruit from sticking.
- Place a serving plate or wire rack over the top of the cake tin, then carefully invert the cake onto it. Lift the tin away slowly, then gently peel off the baking parchment from the top of the cake.
- Allow the cake to cool slightly before serving, or enjoy it warm. It’s beautiful served just as it is, or with a little cream or custard.
How to Store \u0026 Reheat
Store any leftover cake in an airtight container at room temperature for up to 3 days. To enjoy warm again, you can gently heat individual slices in the microwave for 20-30 seconds, or in a moderate oven (160°C/140°C fan) for about 10 minutes until warmed through. Freezing is not recommended as the fruit topping can become watery upon thawing.
Mary's Secrets to Success
The Perfect Base: Ensure your tin is well-prepared with parchment and a good coating of melted butter and sugar. This is crucial for that beautiful 'upside down' reveal! Drain Your Pineapple: Make sure those pineapple rings are thoroughly drained. Excess moisture can make the topping watery and prevent that lovely caramel from forming properly. Room Temperature Ingredients: For the cake batter, using softened butter and eggs at room temperature is essential. They emulsify much better, giving you a smooth, light, and fluffy batter. Don't Overmix: Once you've added all the cake ingredients, beat until just combined and smooth. Overmixing can develop the gluten too much, leading to a tougher cake. We want a tender crumb! The Big Reveal: Be brave when inverting! A swift, confident flip onto your serving plate is often best. Then, slowly lift the tin. It's always a moment of delightful anticipation!
Frequently Asked Questions
How do I prevent the pineapple from sticking to the tin?
The key here, my dear, is to ensure you generously grease and line the base of your tin with baking parchment, and don't skimp on the melted butter and muscovado sugar for the topping. This creates a lovely caramel layer that helps the fruit release beautifully. Allowing the cake to cool for just a few minutes in the tin before inverting also helps the caramel firm up slightly.
Can I use fresh pineapple instead of tinned?
While you certainly could, fresh pineapple contains enzymes that can sometimes prevent the cake from setting properly or make it a little too tart. For this classic recipe, tinned pineapple rings, drained well, truly give the best, most consistent result and that wonderfully sweet caramelisation we're looking for.
How do I know when the cake is perfectly cooked?
A beautifully baked cake should be golden brown on top and feel springy to the touch in the centre. The most reliable test is to insert a thin skewer or cocktail stick into the middle of the cake; if it comes out clean, without any wet batter clinging to it, then your cake is perfectly done.
My cake looks a bit pale, what went wrong?
A pale cake often indicates that your oven temperature might be a little low, or it simply needs a few more minutes. Don't be afraid to give it an extra 5-10 minutes, keeping a close eye on it. Every oven is a little different, so trust your instincts and the skewer test!
Can I make this cake ahead of time?
Indeed you can! This cake is lovely on the day it's baked, but it also keeps beautifully for a couple of days in an airtight container at room temperature. The flavours often meld and deepen a little, making it just as delightful the next day.